Microsoft Word has a few editing gems hidden right under our noses in the form of a several standard, but underappreciated, commands connected to standard keyboard shortcuts. No macros required this time (sorry). I'm not wasting your time with barely used shortcuts, here are some of my favorites with a bonus I use I use less often but is still nice.
Thanks for your interest
This content is part of a paid plan.
Best standard Word shortcuts for writers
Sometimes, the dialog order is off, or the description is placed too early. We just want to move a paragraph up or down and be done with it. The old way is to grab the mouse and start selecting stuff. Cut, paste, blah, blah, blah ... boring and slow. Even if we use our keyboard to select the paragraphs, it’s still a lot of clicky-clacking around for an otherwise repetitive task. Those little bits of time add up, so wouldn't it be nice to just tap a key or two, and it’s done? No fuss.
Hopefully by now, you’ve got the idea that there’s a better way, and this time we don’t even have to create the solution ourselves with a macro.
Move current paragraph
Technically, this example is an outline-related shortcut, but it works for regular body text paragraphs also which is how I use it most often.
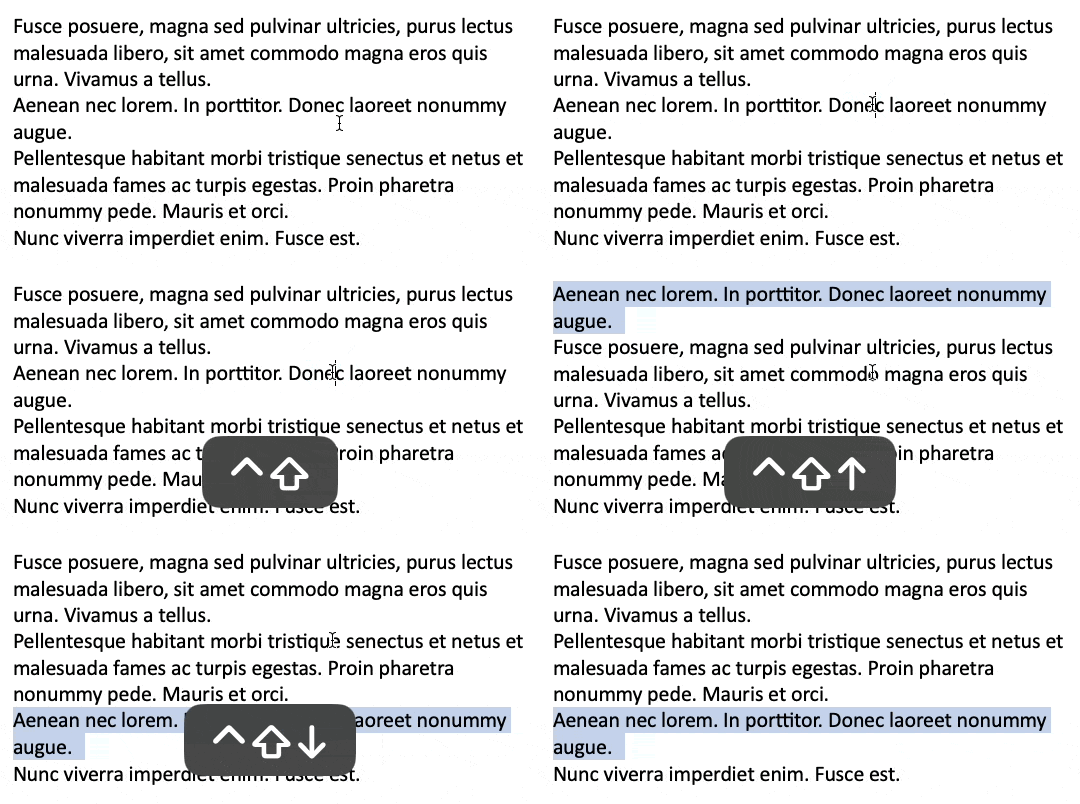
On Word for Mac, we move the current paragraph above the previous paragraph in the document using the keyboard shortcut Control+Shift+Up. Conversely, move the paragraph down using Control+Shift+Down arrow. On Windows, the corresponding shortcuts are Alt+Shift+Up and Alt+Shift+Down arrows, respectively.

I personally remapped these shortcuts (actually used a more automated approach in member content), but they're definitely in my top ten favorite Word keyboard shortcuts, and they've been in Word the whole time. I use them almost every day I write and several times just while writing this article. It even works for list paragraphs. Give these a try even if you ignore the others below.
Move multiple paragraphs
When used with a starting selection, the command automatically selects the entirety of any partially selected paragraphs and then moves them up or down one paragraph at a time in the document as a group. This is a handy variation at times.
Promote or demote headings
I use these all the time in my novel notes in Word. For this section, we’ll use “heading level” and “outline level” almost synonymously. The main difference is the former is a standard Word paragraph style which is assigned a corresponding outline level number. Outline levels vary from 1 for Heading 1 to level 9 for Heading 9. Body text has an outline level 10 meaning no heading level.
School of hard knocks
The School of Hard Knocks is a vaunted southern (USA) educational system, but I suspect you've also attended this noteworthy instructional institution at some point. Tuition is free except for the knots on the head and maybe a bashed fender or two.
Years ago, when I wanted to add a subheading in my novel notes, I had to hunt for the current heading level. Then I’d need to scroll through the (not so) Quick Style menu to find the correct heading level style and click it before finally checking the navigation pane to make sure everything looked right.
Annoying.
Then I discovered the Outline Promote and Outline Demote keyboard shortcuts. (Actually, don’t tell anyone, but I wrote an almost complete pair of macros to do this before I discovered Word had already done it for me. In fact, theirs was a little better than mine by handling multiple paragraphs more naturally.)
Quick summary
The key point is you don’t have to know the current outline level to apply the appropriate heading style. Just use the shortcut and let Word figure that out! Additional details affect the command behavior depending on the paragraph style at the insertion point (where the blinking I-bar is not the mouse pointer), so see below for more explanation of the specifics.
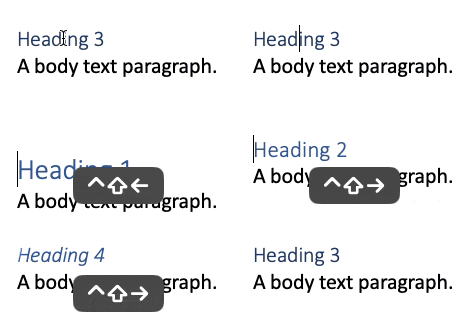
The animation examples below have a macro tweak to display the paragraph heading levels for presentation purposes. The standard shortcuts do not manipulate the heading paragraph text.
Typical use
On a Mac, the default shortcut to promote the current paragraph within Word’s heading structure is Control+Shift+Left arrow. Similarly, Control+Shift+Right arrow will demote the current paragraph to one level below the current heading in which the paragraph resides. In Word for Windows, the respective shortcuts are Alt+Shift+Left arrow to promote and Alt+Shift+Right arrow to demote the current paragraph or heading.

I often don't remember the outline level, so it’s great to just tap the keyboard shortcut and let Word figure out what the correct outline level is for the current paragraph. That’s enough to use them, but if you want a little more clarity on the details, read on.
Not indent related
This shortcut is different than the “Increase indent” or “Decrease indent” Ribbon buttons. Those commands basically indent the text and nothing more.
What about multiple headings?
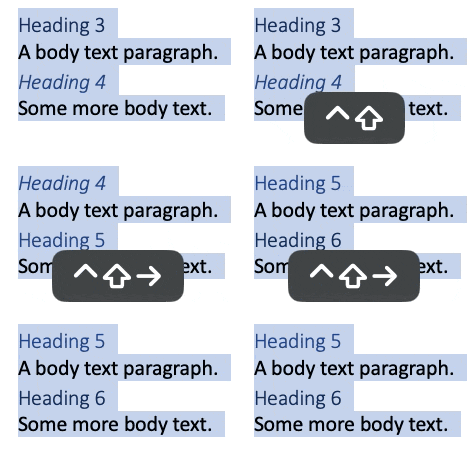
Both outline promotion commands act a little differently depending on what text is selected. First, if multiple paragraphs are selected with at least one Heading paragraph included, each command will apply the action to all selected paragraphs with a “Heading” style. Importantly, any body text paragraphs are ignored.

Ignoring body text paragraphs as a default behavior may sound counter intuitive at first, but it allows us to select a large block of outlined text and just act on the headings. This behavior is much more useful than converting all paragraphs to headings.
If all the paragraphs in the selection are body text, then the Outline promote command will work normally on each paragraph.
Outline promote and demote details
A Heading 1 paragraph style is the highest priority heading level in the document. Title or Subtitle paragraph styles don’t count as headings (unless you tweak the base styles like I do). Heading 9 is the lowest heading level possible in Word. A body text paragraph has an outline level value of 10 which is basically not a heading.
As a quick aside, only Heading paragraphs and any derived heading styles show up in the Navigation Pane.
Outline promotion details
When using the keyboard shortcuts, outline promotion in Word does the following depending on the current heading level:
- For Heading X, where X is the heading level number, the paragraph style is increased by one heading level priority. That is, it is promoted to a Heading X-1 paragraph style. For example, a Heading 3 is promoted to a Heading 2.
- Promotion does not affect a paragraph with a Heading 1 style.
- A body text paragraph, such as a Normal paragraph style, is promoted to the same outline level under which the paragraph resides. For example, a body text paragraph under a Heading 3 is promoted to a Heading 3. A body text paragraph under no heading is promoted to a Heading 1 style.
Outline demotion details
Outline demotion in Word does the following:
- A Heading X paragraph style is demoted down one priority level to a Heading X+1 paragraph style. For example, a Heading 3 is promoted to a Heading 4.
- Demotion does not affect a paragraph with a Heading 9 style. That is, the Heading 9 paragraph style is not demoted to body text.
- A body text paragraph, such as a Normal paragraph style, is promoted to one outline level below the current heading in which the body text paragraph resides. For example, a body text paragraph under a Heading 3 is promoted to a Heading 4. A body text paragraph under no heading is promoted to a Heading 2 style.
Practice
These keyboard shortcuts won’t do any good for you unless you use them. Pick the one or two you like most and practice it the next time you need it. It might take a moment to resist your muscle memory and hit the shortcut instead, but I suspect you’ll eventually wish you’d known about them years ago.
Apply heading styles 1, 2, or 3
What if you know what heading level you want to set for the current paragraph?
Fortunately, Word provides three shortcuts to that effect. Specifically, Command+Option+1, 2, or 3 to assign the respective heading styles 1, 2, or 3 in Word for Mac. On Windows, the shortcuts are Control+Alt+1, 2, or 3, respectively.
I use these occasionally since it’s easier than hunting through my Quick Styles on the ribbon when I know precisely what heading level I want. There are no stock keyboard shortcuts for Heading 4 style or below, but if you want that, you could always make your own using a macro. We’ll talk about how to change paragraph styles in a macro later.
That’s it for now. Go forth and edit faster!


